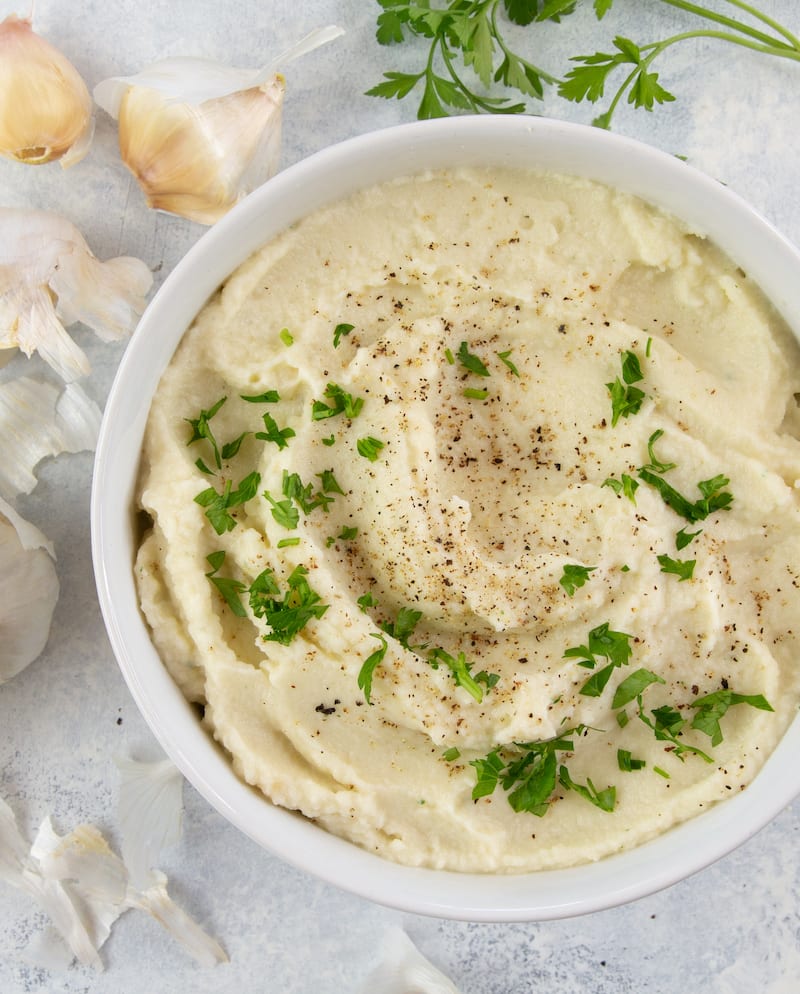
I love the addition of sweet and creamy roasted garlic to a basic cauliflower mash. This is the perfect side to any meal, but festive enough to serve for Thanksgiving, too. It may not seem like Thanksgiving without mashed potatoes but you won’t miss them. This creamy, flavorful mash is just as delicious! This recipe also takes classic “faux-tatoes” and revamps them to make an entirely dairy-free side to enjoy with any meal. This recipe is one from my new book, Beyond Simply Keto.
This mash will be on the table in less than an hour, with only 10 minutes of prep time. You’ll start by roasting the garlic. Cut the top off the bulb of garlic, about one-third of the way down, exposing the insides of most of the cloves. Place the bulb of garlic on a piece of aluminum foil, drizzle the olive oil over the top, and loosely wrap with the foil. Roast the bulb for 40 minutes, until the cloves are golden brown and tender. Once done, use a small spoon to gently scoop out the roasted garlic. Set aside 6 cloves for use in this recipe.
When the garlic has been in the oven for 20 minutes, begin preparing the cauliflower mash. Core the cauliflower and chop the florets into small pieces. Bring a large pot of salted water to a boil. Add the cauliflower. Cook until tender, about 20 minutes. Drain, then set on a paper towel and pat dry.
Put the cooked florets along with the garlic and the rest of the mash ingredients in a high-powered blender or food processor and blend just until smooth. Garnish with fresh parsley.
You’ll find that this recipe will leave you with some extra roasted garlic. Use it to make aioli, or mix with butter to spread over veggies, streak, or chicken. You can also chop it and add it to a salad dressing, or to the top of a keto pizza. Yum!
Cut the top off the bulb of garlic, about one-third of the way down, exposing the insides of most of the cloves. Place the bulb of garlic on a piece of aluminum foil, drizzle the olive oil over the top, and loosely wrap with the foil.
Roast for 40 minutes, until the cloves are golden brown and tender. When the garlic has been in the oven for 20 minutes, begin preparing the cauliflower mash.
Use a small spoon to gently scoop out the roasted garlic. Set aside 6 cloves for use in this recipe.
Make Cauliflower Mash
Core the cauliflower and chop the florets into small pieces.
Bring a large pot of salted water to a boil. Add the cauliflower and cook until tender, about 20 minutes. Drain, then set on a paper towel and pat dry.
Put the cooked florets along with the rest of the mash ingredients in a high-powered blender or food processor and blend just until smooth. Garnish with fresh parsley.
Notes
Instant Pot Method: Core the cauliflower and cut the florets into 3 to 4 large sections. Pour 1 cup of water into the Instant Pot and place the large cauliflower pieces inside. Lock the lid, then turn the steam knob to the " sealed" setting. Press the vegetable steam button. Once complete, transfer the steamed cauliflower to a colander to drain, then set on a paper towel and pat dry. Complete from Step 3 above to make the mash. https://ketokarma.com/garlic-cauliflower-mash-keto-recipe-thanksgiving/#wprm-recipe-container-2926
Use enough coconut oil to cover the bottom of a frying pan, sprinkle in the turmeric and pepper and fry the eggs, salting them as you like. I used a mandolin on the sweet potatoes to make the "chips," then used some olive oil and pepper to coat and season. Depending on the thickness of the sweet potato slices, you can cook in a 400-degree oven for about 20 minutes or so, flipping them occasionally until they're done the way you like.
Skip the dairy and charge up your brain with a steaming hot mug of dairy-free bulletproof coffee. This drink is just as good, if not better than the original version. Recipe from the book, The Keto Beginningby Leanne Vogel of Healthfulpursuit.com.
KetoFLEX 12/3 is a diet (that becomes a lifestyle) to optimize cognition. Let’s break it down so it’s easier to understand.
Keto refers to ketosis, the natural process by which your body breaks down stored and dietary fat to use as fuel.
FLEX refers to metabolic flexibility, the ability to use either glucose or fat as a fuel source. FLEX also refers to a flexitarian diet, in which meat is optional.
12/3 refers to the minimum amount of time each day that you should spend fasting; for at least 12 hours and at least 3 hours before bed.
The Importance of Ketosis
Specialized imaging has demonstrated that a reduction in the brain’s ability to use glucose precedes and accompanies Alzheimer’s disease. Evidence has shown that ketones can be used effectively as an alternative and adjunct fuel. To learn more, see Why is Ketosis Important for Brain Health.
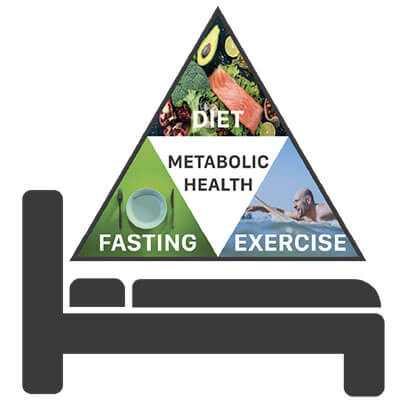
How To Create Ketones
You can create ketones by combining the three components of the KetoFLEX 12/3 lifestyle: diet, fasting, and exercise on a foundation of quality sleep.
When combined, they heal metabolism and provide clean sustainable fuel for your brain.
You can test your blood glucose and ketones with Precision Xtra, KetoMojo or the BIOSENSE breath ketone meter to track your progress.
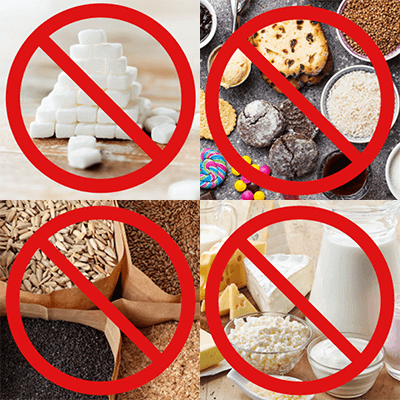
Before Starting
It’s very important to first eliminate the inflammatory foods below for several reasons. Most importantly, combining inflammatory foods with a high fat diet (even with healthy fats) can contribute to coronary artery disease. Secondly, many of these foods can contribute to insulin resistance and impede your ability to naturally achieve ketosis.
To learn about the benefits of fasting, including autophagy, often referred to as cellular housekeeping, read Cognitive Restoration Through Fasting. See fasting goals below.
Fasting Goal
Everyone should stop eating at least three hours before bed and extend the fast for at least twelve hours. Those who are ApoE4 positive can work on slowly extending the fast to 16+ hours.
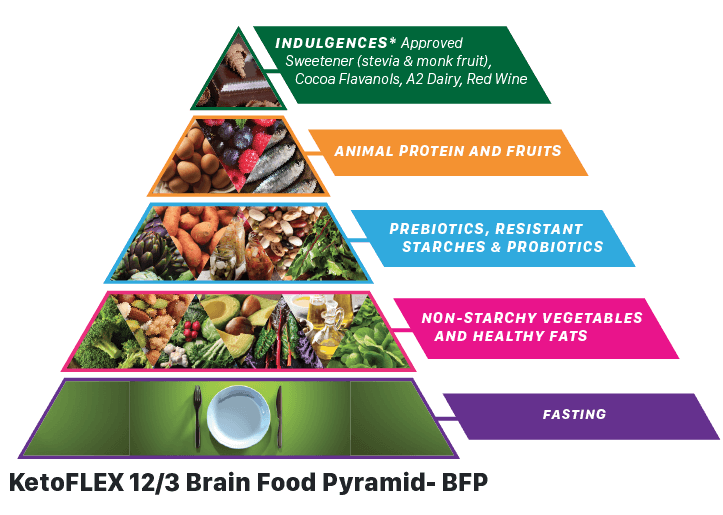
Level Two: Freely Indulge
This is the level of the pyramid that comprises the foods — non-starchy vegetables and healthy fats — that will make up the majority of your plate. See tips below for making smart choices.
Non-starchy Vegetables
Non-starchy vegetables are those with a low glycemic index that won’t spike your blood glucose or affect your ability to get into ketosis. Freely enjoy deeply pigmented, organic, seasonal, preferably local, non-starchy vegetables, including leafy greens and cruciferous, (some raw and some cooked) with fresh herbs, spices, and teas.
Healthy fats
Increasing healthy fats, such as high polyphenol extra virgin olive oil (EVOO), avocado, nuts, and seeds will not only make the nutrients from your vegetables more bioavailable, but it will also help you achieve nutritional ketosis.
Level Three: Upgrade Your Gut
It’s very important to work on healing underlying chronic GI issues and to promote gut health as you are implementing this new diet. The gut microbiome provides the foundation for healthy function of our nutritional, immune, hormonal and neurological systems.
Specific foods, including prebiotic fiber (artichoke hearts, jicama, dandelion greens, mushrooms, leeks, green banana, etc.), resistant starches (tubers, legumes, parsnips, cassava root, rutabagas, pistachios, etc.) and probiotic foods (fermented vegetables, sauerkraut, kimchi, low sugar kombucha, tempeh, miso, etc.) in small quantities as tolerated can help to cultivate a healthy gut.
Level Four: Choose Wisely
This level of the pyramid includes animal protein and fruit, both of which can be very healthful, but should be chosen carefully and intake moderated. See tips below.
Animal Protein
It’s very important to get an adequate amount of protein but consuming too much impedes autophagy (also fostered by fasting), metabolic health, and even longevity. Healthy people, under age 65, should limit protein consumption to 0.8-1.0 gram per kilogram of lean body mass per day. Concurrently implementing a strength training program to avoid frailty is highly recommended.
When consuming animal protein, quality matters. We recommend prioritizing low mercury, wild-caught seafood for the DHA and eggs from pastured hens for the choline. When eating meat, be sure that it’s 100% pastured.
Fruit
Ancestrally, fruit was enjoyed seasonally to fatten up for the winter. Because fruit is now imported from around the globe to be available year round, many people overconsume and choose varieties that are hybridized to be sweeter and lower in fiber impairing metabolic health. Fruit can be very nutritious when carefully selected.
Eat heirloom fruit seasonally. Always balance nutritive value against glycemic concerns. Exceptions include small portions of neuroprotective wild berries, lemons, limes, and unripened tropical fruit (green plantains, bananas, mangoes, papayas, and kiwi) as resistant starch and for their natural digestive enzymes
Level Five: Indulgences
Just as the descriptor indulgences suggests, this is the level of the pyramid where we really start to put on the brakes. While all of the foods included on this level — approved sweeteners, cocoa flavanols, A2 dairy, and dry red wine — can be quite healthful for some, they all need to be enjoyed in moderation.
Approved Sweeteners
If necessary, use limited amounts of approved sweeteners that include pure versions of stevia and monk fruit. Local honey may be used by those who are insulin sensitive.
Cocoa Flavanols
To derive the health benefits of flavanols, enjoy small amounts of high cacao chocolate, low in sugar, cadmium and lead.
A2 Dairy (Less Inflammatory)
You may have small amounts of A2 dairy (such as goat cheese) if tolerated and desired.
Dry Red Wine
Alcohol is a neurotoxin and best avoided by anyone with dependence issues or at risk of or suffering with cognitive decline. If you decide to occasionally indulge, consider small amounts of organic sugar-free, low alcohol red wine.


