Thursday, February 17, 2022

Egg Roll in a Bowl, Vegan Style *****


*****


Oh my word, this was so good!  I'm in love with the name, and I had to try the recipe.  It had all sorts of meat and oil in it, so I created my version.  Delicious!

I made it with a bag of Coleslaw Mix because that's what I had.  It could be made with shredded cabbage, either green or a combination of green and red, plus some extra carrot, too.

To easily grate fresh ginger, I keep it in the freezer, and grate it, while frozen, with a Microplane.

I enjoyed the kick from the Chile de Arbol powder, but it was good without it, too.  Any type of spicy pepper could be used, or it could just be eliminated.

I made this with my favorite Veggie Broth Mix that I always have on hand (1 Tbsp mix to 1 cup water), but it would be good with any vegetable broth.

This was quick, easy, inexpensive, and delicious!  It doesn't get better than that.


1 Tbsp avocado oil
1 Vidalia onion, diced
1 cup veggie broth
4 cloves garlic, pressed or minced
2 celery hearts, diced 
1 16-oz bag coleslaw mix
1 large carrot, shredded [omit]
2 Tbsp Coconut Aminos
1" piece fresh ginger, grated
1/8-1/4 tsp Chile de Arbol Powder, opt.
1 scallion, green part only, sliced


In a wok or large sauté pan, heat avocado oil; add onion and cook onion over medium-high heat, stirring frequently.

As soon as the pan starts to brown, add a small amount of Veggie Broth, and stir to deglaze the pan.  Continue to cook and stir until onion is tender.

Add the rest of the Veggie Broth, plus the garlic, celery, coleslaw mix, and carrot.  Stir, and continue to cook, reducing heat to medium.

Add Coconut Aminos, grated ginger, and Chile de Arbol Powder, if using.  Mix well and cook until cabbage is wilted.

Serve in a bowl, topped with sliced scallion.


Adapted from this recipe.


Sautéed Shallots *****

Shallots

Avocado Oil 

Sea salt


Peel shallots; slice into very thin slices.

Lightly coat a sauté pan with avocado oil; heat over medium heat.  When hot, add shallots to pan and lower heat.  Cook, stirring frequently, until they're tender and slightly brown.  

Watch carefully; they burn easily.


                       ****************************************************


  • 4 shallots or 1 large red onion, peeled and thinly sliced
  1. Place sliced shallots in a large skillet and cover with oil. Pan-fry the shallots over medium to medium-high heat for 10 minutes, or until brown, stirring as needed to ensure even cooking.
    During the last 3 minutes of cooking, add 1 tsp balsamic vinegar to help with caramelization. Transfer shallots to a plate. Blot with a paper towel and season with sea salt. Set aside.


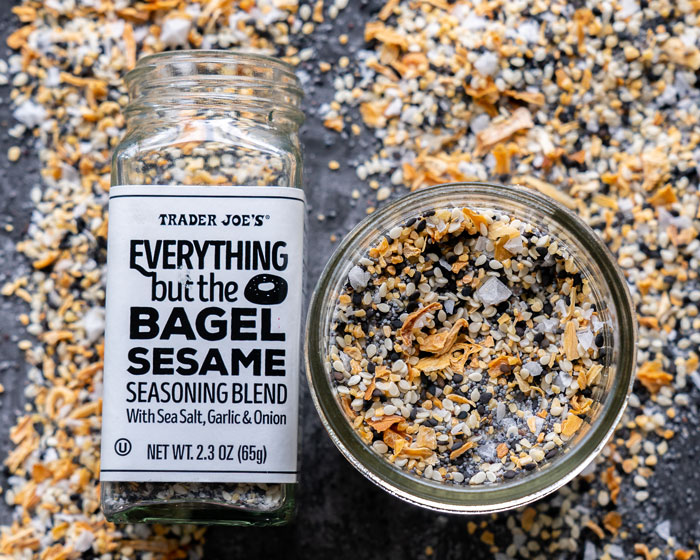
Everything but the Bagel Sesame Seasoning Blend *****


  • 2 Tbsp white sesame seeds
  • 1½ Tbsp poppy seeds
  • 1½ Tbsp dried minced garlic
  • 1½ Tbsp dried onion flakes
  • 1 Tbsp black sesame seeds
  • 2 tsp coarse Himalayan pink sea salt 

  • Combine all ingredients until well mixed.


Author: 
Recipe type: Seasoning
Cuisine: American
Serves: Approx. ½ cup

Nutrition Information
Serving size: approx 1 tbsp. Calories: 33 Fat: 2.5g Trans fat: 0g Carbohydrates: 2.2g Sugar: 0.2g Sodium: 547mg Fiber: 1g Protein: 1.15g Cholesterol: 0mg

https://www.theedgyveg.com/2020/04/07/everything-but-the-bagel-seasoning-recipe/#comments 

Keto Avocado Toast - *****


INGREDIENTS 

PREPARATION

  1. Place egg on non-stick pan with desired oil or cooking spray
  2. Place Sandwich Thins in a toaster oven set to 2 slices for 2.5 minutes
  3. Cut medium avocado into chunks
  4. Flip egg and turn off heat
  5. Remove Sandwich Thins from toaster oven and let cool for 1 minute
  6. Spread 1/2 avocado onto first thin
  7. Layer on second thin
  8. Spread remaining avocado on top layer
  9. Top with fried egg.


Nutrition Per Serving (yields 1 serving):

Calories: 400

Protein: 17g

Carbs: 18g

Fiber: 12g

Net Carbs: 6g

Total Fat: 31g


https://www.outeraislegourmet.com/blogs/blog/avocado-toast


Cauliflower Tortillas - *****


Cauliflower Tortillas


Easy to make low carb tortillas made from riced cauliflower are gluten-free and paleo friendly. And they make great wraps for keto sandwiches.
Prep Time10 mins
Cook Time17 mins
Cooling TIme15 mins
Total Time27 mins

Ingredients

  • 2 cups finely riced cauliflower
  • 2 lge eggs
  • ¼ tsp garlic powder (plus oregano, basil, onion powder)
  • 1 Tbsp coconut flour
  • Himalayan and/or smoked salt to taste

Instructions

  • Preheat oven to 375°F. Line a sheet pan with parchment paper or a silicone mat.
  • Place riced cauliflower in a microwavable bowl and cook on high for 2 minutes. Stir the cauliflower then microwave another 2 minutes.
  • Transfer the cooked cauliflower rice into a dish towel and squeeze out as much liquid as possible.
  • Put the cauliflower back into the bowl and stir in the eggs and garlic powder. Then stir in coconut flour, salt, and pepper.
  • Divide mixture into 6 mounds onto the prepared sheet pan and flatten each into a flat tortilla shaped rounds.
  • Bake for 10 minutes at 375°F, flip each tortilla, then bake for another 5-7 minutes. Remove from oven and place each tortilla on a baking rack to cool for 10-15 minutes.
  • While tortillas are on the cooling rack, add a tablespoon or two of oil into a skillet and heat over medium heat. Once oil is hot, brown each side of the tortillas in the pan to crisp up the edges.

Notes

Inspiration for these cauliflower tortillas comes from Slim Palate.
To give the tortillas some flavor, feel free to add in some dried herbs like oregano, thyme, and basil.
The tortillas can be stored in the refrigerator for up to a week.
The cauliflower tortillas can be frozen for long term storage. They will last at least 3 months and even longer if vacuum sealed before freezing.
https://lowcarbyum.com/cauliflower-tortillas/

Cauliflower Stuffing *****


SO good!!


  •     1 Carrot, chopped
  •     2 cloves Garlic, minced or pressed


  1. Preheat the oven to 450 degrees F. Line an extra large baking sheet with foil and then parchment paper.

  2. In a large bowl, stir together cauliflower, mushrooms, onions, carrot, celery, and garlic. Toss with oil, poultry seasoning, sage, thyme, sea salt, and black pepper.
  3. Spread the mixture in a single layer on the lined baking sheet. Roast in the oven for about 15 minutes, until the onions are soft and cauliflower is starting to brown a little.

  4. Add the pecans to the pan, and stir everything together. Roast for 10-15 more minutes, until the pecans are lightly toasted, cauliflower is well browned, and onions are starting to caramelize.

https://www.wholesomeyum.com/recipes/low-carb-paleo-cauliflower-stuffing-recipe/

Instant Pot Chicken Breast *****


  • 3 pounds chicken breasts fresh or frozen see notes on timing
  • 1 cup vegetable stock 
  • 1 Tbsp garlic, pressed
  • 1 tsp Himalayan salt 


  • Place chicken into the inner pan of the Instant Pot. Sprinkle the chicken with salt. Pour the broth over the chicken breast and add the minced garlic. (Use 1 cup of liquid for a 3 or 6 quart Instant Pot and 1.5 cups of liquid for 8 quart Instant Pot.)
  • Close lid and turn vent to the closed (sealed) position.
  • Set Cook Time BASED on Size of Chicken Breasts (The cook time is for what each chicken breast weighs--not what the TOTAL weight is)
    Small Chicken Breast (6-ounce chicken breasts) set time for 6 minutes on high pressure for fresh/ 10 minutes on high pressure for frozen
    Medium Chicken Breast (8-ounce chicken breasts) set time for 7 minutes on high pressure for fresh/11 minutes on high pressure for frozen
    Large Chicken Breast (10-ounce chicken breasts) set time for 8 minutes on high pressure for fresh/12 minutes on high pressure for frozen
  • Allow to release naturally for 10 minutes, and then do a quick release if needed.
  • Remove chicken from liquid and rest chicken for 5-10 minutes.
  • Serve as desired.

To Shred Instant Pot Chicken

  • Prepare chicken as recipe directs above. Once cook time has elapsed and pressure has released naturally for at least 10 minutes, remove the cooked chicken breast from the instant pot and drain off all but ½ cooking liquid. Add chicken and reserved liquid back into the inner pot or a large mixing bowl and shred with two forks or a handheld mixer on medium speed. You can also shred in a stand mixer on low speed.

Notes

Determining Cook Time: I use organic chicken breasts. Each breast is about 6-8 ounces. So if your chicken breasts are larger, you need to increase the time by 1-2 minutes. Just be sure to reach 165 degrees for doneness (It can come out of the pressure cooker at 160-162 and will raise to 165 as it rests.) If the chicken is not cooked to at least 160 degrees, place the lid back on the pressure cooker and set the cooking time for 1-3 minutes based on how many degrees it needs to raise.
Poultry Setting: You do NOT need to use the poultry setting, just high pressure. (Hit manual or pressure cook and adjust the pressure to high and set time.)
Seasoning: Feel free to season the chicken breast with Seasoned SaltTaco Seasoning, or simply salt and pepper if desired. You can also use 1 teaspoon garlic powder in place of minced garlic. 
Storing: Cooked Chicken Breast will keep in the refrigerator for 3 days. Or can be frozen for up to 3 months. To freeze, it is best to shred the chicken and then allow the chicken to cool completely. Once cooled, seal in freezer-safe bags and freeze for future use.
https://amindfullmom.com/instant-pot-chicken-breasts/

Nutrition

Calories: 141kcal | Carbohydrates: 2g | Protein: 24g | Fat: 2g | Cholesterol: 72mg | Sodium: 519mg | Potassium: 446mg | Sugar: 2g | Vitamin A: 35IU | Vitamin C: 3.6mg | Calcium: 10mg | Iron: 0.5mg


Hard-Boiled Eggs in the Instant Pot (5-5-5) *****


  • Eggs (as many as you like to fill the bottom of the pot rack)
  • 1 cup water

  1. Pour the water into the pot, and place the eggs in a steamer basket if you have one. If you don't, just use the rack that came with your pot.
  2. Close the lid, set for 5 minutes at high pressure.
  3. It will take the cooker approximately 5 minutes to build to pressure and then 5 minutes to cook. I let the pressure naturally reduce for an additional 5 minutes after the cooking cycle completed, and then did a quick pressure release. That's around 15 minutes, total.
  4. Place the hot eggs into cool water to halt the cooking process. You can peel immediately, or wait-- it's up to you. (The first time I did this, I didn't plunge into cool water, and they still peeled very easily. The eggs were just slightly more cooked.)


http://www.theprairiehomestead.com/2016/04/instant-pot-hard-boiled-eggs.html


Frozen Vegetables in the Air Fryer


Spray air fryer basket with olive oil, then add the frozen mixed veggies. Do not allow vegetables to thaw first, add them straight from the freezer to the air fryer for best results. Air fry at 400 degrees for 10 minutes. Stir and shake the vegetables, then air fry another 5 - 10 minutes, until crispy.

Wednesday, February 16, 2022

Four Ways to Freeze Fresh Herbs


Using fresh herbs straight from the garden is a summer pleasure even the most casual cook can appreciate. Sadly, like summer itself, it’s all too fleeting. Once picked, their shelf life can be extended a bit, but fresh herbs are decidedly “of the moment.” Drying herbs is probably the best known method for preserving summer herb surpluses, and may be the easiest way to make “hard” herbs like oregano, bay or rosemary last. However, drying doesn’t always capture the flavor as well as we’d like, and for herbs with a higher moisture content like mint, parsley or chives, dehydration may not be an effective option for preservation.


Freezing herbs is fast, easy and retains much of the taste, smell and nutrients found in fresh herbs. Although they aren’t always pretty and may not stand up to scrutiny for use in salads or as a garnish, frozen herbs will retain much of the flavor of fresh-picked herbs for use long after the growing season has ended.

Enjoying a surplus in the herb garden? Try these four strategies for freezing fresh herbs: 

Freezing Bare Herbs

Many herbs can be simply frozen on the stem and stored in an airtight container. Left on the stem, hardier herbs like rosemary, dill, thyme, bay or sage can be spread in a single layer on a baking sheet or plate and placed in the freezer. Once frozen, transfer into any airtight container for freezer storage without clumping. To use, simply remove herbs a sprig at a time. Some herbs, like chives, can be chopped and frozen bare with little loss of flavor.

Freezing in Water

For long-term storage, tender herbs like mint, parsley and cilantro can be removed from their stems and frozen into ice cubes. Pack ice cube trays with chopped or whole leaf herbs, cover with water and pop into the freezer. Once frozen, cubes can be transferred into a Ziploc bag or other airtight container for easy, single-serve access.

Freezing in Oil

Basil freezes best when first processed into pesto, but this practice also works well with other herbs like oregano or thyme to be used in soups, sauces or other dishes where oil is welcome. Remove stems and combine about a cup of fresh herbs with 1/4 cup of olive oil in a food processor. Pulse to blend, then transfer into ice cube trays. Once frozen, move cubes into an airtight container for long-term storage. To retain whole leaves, leaves may be removed from stems, placed in ice cube trays and then covered with oil to freeze.

Rolled Herbs

Flat-leaf herbs like Italian parsley or sage can be compressed and rolled for space-efficient storage. Remove stems and loosely fill a Ziploc bag with the leaves. Tightly compress the leaves into the bottom of the bag, seal and roll the bag around the bundled herbs. Secure with rubber bands or twine and place in the freezer. Rolled herbs can then be sliced as needed for use in recipes.